Are your tiles looking dull and dirty? This article will provide you with simple and effective tips on how to clean tiles and restore their shine. From regular maintenance to tackling tough stains, you will discover easy step-by-step methods that will leave your tiles looking fresh and inviting. Say goodbye to grime and hello to sparkling tiles with these helpful cleaning techniques.
Gathering the necessary supplies
Before you begin the tile cleaning process, it’s important to gather all the necessary supplies. This will ensure that you have everything you need within arm’s reach, making the entire cleaning process more efficient and organized.
Choosing the right cleaning solution
The first step in gathering supplies is choosing the right cleaning solution for your specific type of tile. Different types of tiles require different cleaning solutions, so it’s crucial to select the appropriate one to avoid damaging or discoloring the tiles. Consult the manufacturer’s instructions or do some research to determine the best cleaning solution for your particular type of tile.
Gathering cleaning tools
Next, you’ll need to gather the cleaning tools you’ll be using during the tile cleaning process. Some essential cleaning tools include a broom or vacuum cleaner, a mop, scrub brushes, microfiber cloths, and a bucket. Depending on the type of tiles you have and the extent of the cleaning required, you may also need a steam cleaner, a grout brush, or a squeegee.
Preparing protective gear
Lastly, don’t forget to prepare protective gear before diving into the cleaning process. Cleaning solutions, especially those containing chemicals, can be harsh on the skin and eyes. Therefore, wearing rubber gloves and safety goggles is recommended to protect yourself from any potential irritation or injury. Additionally, it’s a good idea to wear comfortable clothes that you won’t mind getting dirty, as tile cleaning can be a messy task.
Preparation before cleaning
Before you start cleaning the tiles, there are a few important preparatory steps to take. These steps will ensure that the cleaning process goes smoothly and effectively, allowing you to achieve the best possible results.
Clearing the area
Before you begin cleaning, it’s important to clear the area surrounding the tiles. Remove any obstacles or furniture that may hinder your access to the tiles, allowing you to clean them thoroughly. This will also prevent any damage to the furniture or items in case of spills or splashes during the cleaning process.
Removing loose debris
Once the area is clear, start by removing any loose debris from the tiles. This can be done by sweeping the tiles or using a vacuum cleaner to remove any dirt, dust, or crumbs. Removing loose debris before applying any cleaning solution will make the cleaning process more effective, preventing the debris from spreading or getting stuck in the cleaning solution.
Removing surface stains
If there are any surface stains on the tiles, it’s a good idea to remove them before proceeding with the cleaning. Use a soft cloth or sponge with a mild cleaning solution to gently scrub the stained areas. Be careful not to use any abrasive materials or harsh chemicals that could damage the tiles. Once the stains have been treated, rinse the tiles thoroughly and allow them to dry before proceeding to the next step.
Test cleaning solution
Before applying the cleaning solution to the entire area, it’s essential to test it on a small, inconspicuous area of the tiles. This will help you determine if the cleaning solution is appropriate for your specific type of tile and if it causes any unwanted discoloration or damage. Apply a small amount of the cleaning solution using a cloth or sponge and wait for a few minutes. If there are no adverse effects, you can proceed with confidence knowing that the cleaning solution is safe for your tiles.
Cleaning ceramic tiles
Ceramic tiles are a popular choice for both kitchen and bathroom floors due to their durability and water-resistant properties. To keep them looking their best, regular cleaning is essential. Here’s a step-by-step guide on how to clean ceramic tiles effectively.
Sweeping the tiles
Start by sweeping the tiles to remove any loose dirt, dust, or debris. Use a broom or a vacuum cleaner with a soft brush attachment to ensure that all the surface dirt is removed. This will make the cleaning process more effective and prevent any scratches on the tiles.
Mixing the cleaning solution
Next, mix the appropriate cleaning solution for ceramic tiles. For regular maintenance cleaning, a mixture of warm water and a mild detergent should suffice. Use a bucket or spray bottle to prepare the solution, following the instructions on the detergent bottle for the correct dilution ratios.
Applying the solution to the tiles
Once the cleaning solution is ready, apply it to the ceramic tiles. You can either pour the solution directly onto the tiles or spray it evenly across the surface. Ensure that the entire area is covered with the cleaning solution, focusing on any heavily soiled or stained areas.
Scrubbing the tiles
After applying the cleaning solution, it’s time to scrub the ceramic tiles to remove any dirt or grime. Use a soft-bristle brush or a scrub brush to gently scrub the tiles in a circular motion. Be cautious not to use any abrasive materials or harsh scrubbing techniques that could scratch or damage the tiles.
Rinsing the tiles
Once the tiles have been thoroughly scrubbed, rinse them with clean water to remove any residue or leftover cleaning solution. You can use a mop or a clean sponge to wipe away the cleaning solution, ensuring that all traces of soap or detergent are removed.
Drying the tiles
Lastly, dry the ceramic tiles to prevent any water spots or streaks from forming. You can use a clean, dry microfiber cloth or a mop to absorb the excess moisture on the tiles. Alternatively, you can allow the tiles to air dry naturally, ensuring proper ventilation to expedite the drying process.
Cleaning porcelain tiles
Porcelain tiles, known for their durability and low maintenance, are a popular choice for both flooring and wall installations. However, they still require regular cleaning to maintain their appearance and prevent the build-up of dirt and grime. Here’s a step-by-step guide on how to clean porcelain tiles effectively.
Sweeping the tiles
Start by sweeping the porcelain tiles to remove any loose dirt, dust, or debris. Use a broom or a vacuum cleaner with a soft brush attachment to ensure thorough removal of the surface dirt. This step is important to prevent any scratching or smearing of dirt during the cleaning process.
Preparing the cleaning solution
Next, prepare a suitable cleaning solution for porcelain tiles. A mixture of warm water and a mild pH-neutral cleaner or a specifically formulated porcelain tile cleaner is recommended. Avoid using acidic or abrasive cleaners that could cause damage to the tiles.
Applying the solution to the tiles
Once the cleaning solution is ready, apply it to the porcelain tiles. You can either pour the solution directly onto the tiles or use a spray bottle to distribute it evenly across the surface. Ensure that all areas are covered, paying extra attention to any heavily soiled or stained areas.
Scrubbing the tiles
After applying the cleaning solution, use a soft-bristle brush or a non-abrasive scrub brush to gently scrub the porcelain tiles. Focus on any areas that require additional attention, such as grout lines or stubborn stains. Avoid using abrasive materials or harsh scrubbing techniques that could damage the tiles.
Rinsing the tiles
Once the tiles have been thoroughly scrubbed, rinse them with clean water to remove any residue or leftover cleaning solution. This can be done using a mop or a clean sponge, ensuring that all traces of soap or detergent are removed. Proper rinsing is essential to prevent any residue from building up on the tiles.
Drying the tiles
To prevent water spots or streaks from forming, it’s important to dry the porcelain tiles thoroughly after cleaning. Use a clean, dry microfiber cloth or a mop to absorb the excess moisture. Alternatively, you can allow the tiles to air dry naturally, ensuring proper ventilation to expedite the drying process.
Cleaning natural stone tiles
Natural stone tiles, such as marble, granite, or slate, add elegance and sophistication to any space. However, their unique composition requires specialized care to prevent damage and maintain their natural beauty. Here’s a step-by-step guide on how to properly clean natural stone tiles.
Choosing the appropriate cleaner
When it comes to cleaning natural stone tiles, it’s crucial to select a cleaner specifically formulated for the type of stone you have. Different types of natural stone have varying levels of porosity and sensitivity to certain cleaning agents. Consult the manufacturer’s guidelines or seek advice from a professional to ensure you choose the appropriate cleaner for your specific type of natural stone.
Sweeping the tiles
Begin by sweeping the natural stone tiles to remove any loose dirt, dust, or debris. Use a broom or a vacuum cleaner with a soft brush attachment to avoid scratching the surface. Pay close attention to any crevices or grout lines where dirt may accumulate.
Preparing the cleaning solution
Next, prepare the cleaning solution according to the instructions provided by the manufacturer of the chosen cleaner. Dilute the cleaner in a bucket of water, following the recommended ratio. Ensure that the cleaning solution is suitable for the type of natural stone you’re working with to avoid any damage.
Applying the solution to the tiles
Once the cleaning solution is prepared, apply it to the natural stone tiles. Use a mop or a soft cloth to distribute the solution evenly across the surface. Be thorough in covering all areas, including any stains or heavily soiled spots.
Gently scrubbing the tiles
To remove dirt and grime from the natural stone tiles, gently scrub the surface using a soft-bristle brush or a non-abrasive scrub brush. Avoid using any abrasive materials or harsh scrubbing techniques that could scratch or damage the delicate surface of the stone.
Rinsing the tiles
After scrubbing the tiles, rinse them thoroughly with clean water to remove any residue or leftover cleaning solution. This can be done using a mop or a clean sponge, ensuring that all traces of soap or detergent are removed. Proper rinsing is essential to prevent any residue from dulling the appearance of the natural stone.
Drying the tiles
Finally, dry the natural stone tiles to prevent any water spots or streaks. Use a clean, dry microfiber cloth or a mop to absorb the excess moisture. Pay attention to any areas where water may pool or collect, such as corners or crevices. Proper drying will help maintain the shine and beauty of the natural stone tiles.
Polishing the tiles
For an extra touch of elegance and shine, you may choose to polish the natural stone tiles after they are dry. Use a stone-specific polishing product and follow the manufacturer’s instructions carefully. Polishing will help restore the natural luster of the stone and provide additional protection against staining and wear.
Cleaning grout between tiles
Grout, the material used to fill the spaces between tiles, can accumulate dirt, stains, and even mold over time. Cleaning the grout not only improves the overall appearance of the tiles but also helps extend the lifespan of the grout. Here’s a step-by-step guide on how to clean grout effectively.
Sweeping away loose dirt
Before tackling the grout, sweep the area between the tiles to remove loose dirt, dust, or debris. You can use a small broom or a dry cloth to clear away any surface dirt. This will prevent any loose particles from getting mixed into the cleaning solution and potentially scratching the tiles.
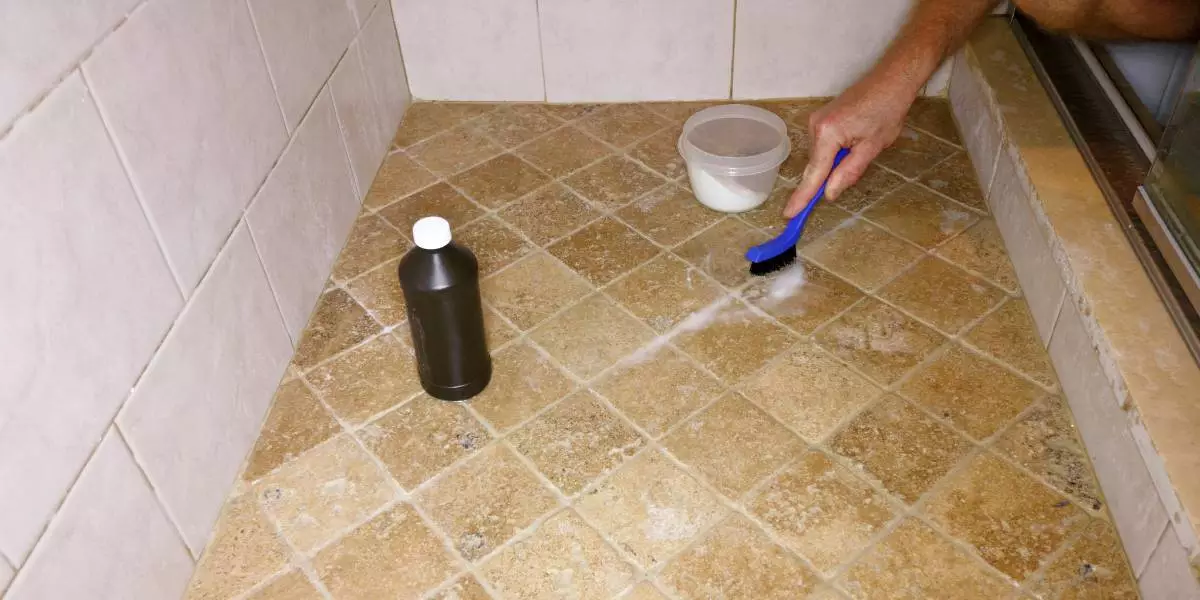
Preparing a homemade grout cleaner
To clean grout, you can create a simple and effective homemade cleaner using baking soda and water. Mix equal parts of baking soda and water in a small bowl until you have a paste-like consistency. The mild abrasive properties of baking soda help lift stains and dirt from the grout without causing damage.
Applying the cleaner to the grout
Once you have the homemade cleaner ready, use a small brush or an old toothbrush to apply the paste to the grout lines. Focus on one small section at a time to ensure thorough coverage. Apply the paste in a circular motion, working it into the grout lines for maximum effectiveness.
Scrubbing the grout
After applying the cleaner, scrub the grout lines using the brush or toothbrush. Use firm but gentle pressure to agitate the grout and loosen any dirt or stains. Pay extra attention to any particularly stubborn stains or heavily soiled areas, reapplying the cleaner if necessary.
Rinsing the grout
After scrubbing the grout, rinse the area with clean water to remove any residue or leftover cleaner. You can use a sponge or a damp cloth to wipe away the excess paste and grime. Rinse the sponge or cloth frequently to ensure that you’re not spreading dirt or grime from one area to another.
Drying the grout
To prevent any water spots or discoloration from forming, it’s important to dry the grout thoroughly after cleaning. Use a clean, dry cloth or towel to remove any moisture from the grout lines. Proper drying will help maintain the cleanliness of the grout and prevent any potential mold or mildew growth.
Sealing the grout
To prolong the cleanliness and longevity of the grout, consider applying a sealant after it has dried completely. Grout sealants create a protective barrier that prevents stains, dirt, and water from penetrating the grout lines. Follow the manufacturer’s instructions carefully when applying the sealant, ensuring that you cover all the grout lines evenly.
Removing tough stains
Occasionally, tiles may encounter tough stains that require a bit more effort to remove. Different types of stains require different approaches, so it’s important to identify the stain correctly before attempting to remove it. Here’s a general guide on how to remove tough stains from tiles.
Identifying the stain
Before you can tackle a tough stain, you need to identify its source. Common stains on tiles can include food or beverage spills, oil or grease stains, ink or dye stains, hard water stains, or even mold and mildew. By identifying the specific type of stain, you can choose the most appropriate stain remover and cleaning technique.
Choosing the appropriate stain remover
Once you have identified the stain, select an appropriate stain remover for that specific type of stain. For example, for food or beverage stains, a mixture of baking soda and water can be effective. For oil or grease stains, a degreaser or a mild detergent might be necessary. Ink or dye stains may require rubbing alcohol or hydrogen peroxide. Hard water stains might call for a vinegar or lemon juice solution. And for mold and mildew stains, a bleach or hydrogen peroxide solution can be effective. Always test the stain remover on a small, inconspicuous area of the tiles before applying it to the stain directly.
Applying the stain remover
Once you have the appropriate stain remover, apply it to the stained area of the tiles. Follow the instructions provided with the stain remover, using a cloth or a sponge to gently blot or rub the stain. Be careful not to scrub too vigorously, as this could damage the tiles. Allow the stain remover to penetrate the stain for the recommended amount of time, giving it a chance to break down the stain thoroughly.
Scrubbing the stain
After the stain remover has had time to work its magic, use a soft brush or a sponge to scrub the stain gently. Move in a circular motion, being careful not to apply excessive pressure. If necessary, you can reapply the stain remover and repeat the scrubbing process until the stain is fully removed. Be patient, as some stains may require multiple attempts and treatments to be completely eliminated.
Rinsing the area
Once the stain has been successfully removed, rinse the area with clean water to remove any residue or leftover stain remover. Use a sponge or a clean cloth to wipe away the excess cleaner, ensuring that the tiles are free from any chemical residue. Thorough rinsing is crucial to prevent any potential damage or discoloration to the tiles.
Drying the tiles
After rinsing, dry the tiles thoroughly to prevent any water spots or streaks from forming. Use a clean, dry cloth or towel to absorb the excess moisture. Pay attention to any areas where water may pool or collect, such as corners or crevices. Proper drying will help maintain the cleanliness and appearance of the tiles.
Preventing mold and mildew
Mold and mildew growth is a common issue in areas with high moisture levels, such as bathrooms and kitchens. These unsightly and potentially harmful substances can cause significant damage if not addressed promptly. Here are some tips to prevent mold and mildew growth on tiles.
Improving ventilation
Proper ventilation is crucial in preventing mold and mildew growth. Ensure that areas with tiles, especially bathrooms and kitchens, are well-ventilated. This can be achieved by opening windows, using exhaust fans, or installing ventilation systems. Good airflow will help reduce moisture levels, discouraging the growth of mold and mildew.
Reducing moisture levels
Excess moisture is a primary contributor to mold and mildew growth. Take steps to reduce moisture levels in areas with tiles by wiping down surfaces after use, fixing any leaks or plumbing issues promptly, and using dehumidifiers or moisture-absorbing products if necessary. Keeping the area dry will make it less hospitable for mold and mildew to thrive.
Cleaning regularly
Regular cleaning is key to preventing mold and mildew growth on tiles. Develop a cleaning routine that includes wiping down tiles, grout, and any other affected areas with a mild detergent or a solution specifically formulated to combat mold and mildew. Regular cleaning will remove any spores or build-up before they have a chance to grow into mold or mildew.
Using mold inhibitors
To further protect your tiles from mold and mildew, you can use mold inhibitors. These products are specifically designed to prevent mold and mildew growth, and they can be applied to the tiles or grout lines after cleaning. Follow the instructions provided by the manufacturer when applying mold inhibitors, ensuring thorough coverage and allowing sufficient drying time.
Repairing leaks and cracks
Leaky pipes or cracks in tiles or grout can provide the perfect environment for mold and mildew to flourish. Inspect your tiles and grout regularly for any signs of damage, such as gaps, cracks, or discoloration. Promptly repair any leaks or damage to prevent water from seeping into the tiles and creating a breeding ground for mold and mildew.
Removing existing mold and mildew
If you already have mold or mildew on your tiles, it’s crucial to remove it promptly to prevent further growth. Use a mold and mildew remover specifically formulated for tiles and follow the instructions provided. Ensure proper ventilation during the removal process, and consider wearing protective gear, such as gloves and a mask, to avoid potential health risks. Once the mold and mildew are removed, continue with regular cleaning and preventive measures to maintain a mold-free environment.
Maintaining tile cleanliness
To keep your tiles looking clean and fresh for an extended period, regular maintenance is key. Here are some tips to help you maintain the cleanliness of your tiles.
Sweeping or vacuuming regularly
Regular sweeping or vacuuming of your tiles will help prevent the build-up of dirt, dust, and debris. Use a broom or a vacuum cleaner with a soft brush attachment to remove any surface dirt or particles that could scratch the tiles. Make this a part of your regular cleaning routine to maintain the cleanliness of your tiles.
Mopping the tiles
Mopping your tiles on a regular basis is essential for maintaining a clean and hygienic environment. Use a mop with a microfiber or a soft cloth attachment along with a suitable cleaning solution for your specific type of tiles. Avoid using excessive water, as it can seep into the grout or under the tiles, potentially causing damage or mold growth. Mop the tiles in a gentle, circular motion, ensuring thorough coverage.
Using steam cleaners
Steam cleaners can be a highly effective tool for cleaning tiles, as they use high-temperature steam to lift dirt, grime, and stains without the need for chemicals. When using a steam cleaner, make sure to follow the manufacturer’s instructions and choose the appropriate setting for your tiles. Keep in mind that not all types of tiles are suitable for steam cleaning, so check the manufacturer’s guidelines before using a steam cleaner on your tiles.
Wiping up spills immediately
Accidental spills are common in areas with tiles, such as kitchens or bathrooms. It’s important to wipe up spills immediately to prevent the liquid from seeping into the tiles or grout, potentially causing staining or damage. Use an absorbent cloth or paper towel to blot the spill, removing as much liquid as possible.
Avoiding abrasive cleaners
While some tough stains may require stronger cleaning agents, it’s generally best to avoid using abrasive cleaners on your tiles. Harsh scrubbing or abrasive materials can scratch or damage the surface of the tiles, compromising their appearance and longevity. Stick to mild cleaning solutions, gentle scrub brushes, and soft cloths to preserve the integrity of your tiles.
Periodic deep cleaning
In addition to regular maintenance, periodic deep cleaning is essential to ensure the long-term cleanliness of your tiles. Deep cleaning involves a more thorough and intensive cleaning process, addressing any deeply embedded dirt, stains, or grime. You can use a specialized tile and grout cleaner or hire professional cleaners to perform this task. Frequency of deep cleaning will depend on the usage, location, and condition of your tiles.
Cleaning different tile surfaces
In addition to the various types of tiles, different tile surfaces require specific cleaning approaches to ensure effective and safe cleaning. Here’s a guide on how to clean different types of tile surfaces.
Cleaning glass tiles
Glass tiles can add a sleek and modern aesthetic to any space, but they require careful cleaning to maintain their transparency and shine. To clean glass tiles, use a gentle glass cleaner or a mixture of warm water and a mild dishwashing detergent. Spray the solution onto the glass tiles and wipe them clean using a microfiber cloth or a soft sponge. Avoid using abrasive materials or harsh chemicals that could scratch or damage the glass surface.
Cleaning mosaic tiles
Mosaic tiles, with their intricate patterns and designs, require special care to preserve their beauty. To clean mosaic tiles, start by removing any loose dirt or debris by sweeping or vacuuming the area. Use a gentle cleaning solution, such as warm water and a mild detergent, or a specifically formulated mosaic tile cleaner.
Apply the solution to a soft cloth or a sponge, and gently wipe the mosaic tiles, paying attention to the grout lines and crevices. Avoid excessive scrubbing or abrasive materials that could damage the delicate mosaic tiles.
Cleaning metal tiles
Metal tiles, such as stainless steel or aluminum, are commonly used as backsplashes or accents in kitchens and bathrooms. To clean metal tiles, start by removing any loose dirt or debris using a soft cloth or a sponge.
For stainless steel tiles, you can use a mixture of warm water and mild dish soap or a stainless steel cleaner. Apply the solution to the tiles, wiping in the direction of the grain or texture. Avoid using abrasive materials or harsh chemicals that could scratch or dull the metal surface. For other types of metal tiles, consult the manufacturer’s guidelines for the appropriate cleaning method and products.
Cleaning cork tiles
Cork tiles, prized for their natural beauty and eco-friendly properties, require gentle cleaning to prevent damage or discoloration. To clean cork tiles, start by removing any loose dirt or debris using a soft brush or a vacuum cleaner with a soft brush attachment. Use a mixture of warm water and a gentle pH-neutral cleaner or a specifically formulated cork tile cleaner.
Apply the solution to a soft cloth or a sponge and gently clean the cork tiles, avoiding excessive scrubbing or soaking. Dry the tiles thoroughly after cleaning to prevent any moisture from penetrating the cork.
Cleaning vinyl tiles
Vinyl tiles, being highly resilient and easy to maintain, are a popular choice for high-traffic areas. To clean vinyl tiles, start by sweeping or vacuuming the area to remove any loose dirt, dust, or debris.
Use a mild cleaning solution, such as warm water and a pH-neutral floor cleaner, or a specifically formulated vinyl tile cleaner. Apply the solution to a mop or a soft cloth and clean the vinyl tiles, focusing on any stained or heavily soiled areas. Avoid using abrasive materials or harsh chemicals that could damage the vinyl surface.
In conclusion, proper tile cleaning is essential for maintaining the appearance and longevity of your tiles. By gathering the necessary supplies, preparing the area, and following the appropriate cleaning techniques for different types of tiles, you can achieve a clean and refreshed look for your space.
Take preventative measures to avoid mold and mildew growth, conduct regular maintenance, and adjust the cleaning approach based on the specific tile surface you’re working with. With these comprehensive tips, you’ll be well-equipped to tackle any tile cleaning task with ease and efficiency. Happy cleaning!