Connecting a 12-3 wire to a 12-2 wire is one of the most common and important tasks in maintaining the circuits in a home. Unfortunately, not everyone knows how to handle or connect them properly to ensure wire safety and avoid any wire-related issues.
Dealing with wires is not easy at all but when you follow the basic rules, you will be able to connect wires just fine.
To connect a 12-3 wire to a 12-2 wire, you will need to make sure that there is no current flowing through the wires. Next, cut the wire ends with a wire cutter. Then, strip the wires using a wire stripper. Match each wire according to color. Connect black to black and white to white by twisting them together with a plier. Finally, secure the wire twists with wire caps and use another wire cap to secure the red wire.
Connecting wires properly will prevent any wire-related accidents and keep your house appliances safe to use and long-lasting. Now that you already have an idea of how to connect 12-3 wires to 12-2 wires, let’s get into more details.
Difference between 12-3 wires and 12-2 wires
12-2 wires and 12-3 wires are both types of wires that are used to carry mechanical loads or electricity. These wires both have conductors and ground wires. These are their similarities, now let’s talk about their differences.
As you may have already observed there are two numbers in each wire name. The first number refers to the wire gauge or the wire measurement for thickness while the second number refers to the number of active conductors in the wire.
In simple words, a 12-3 wire is a 12 gauge wire and has 3 active conductors. A 12-2 wire is as thick as the 12-3 wire however, it only has two active conductors.
Both of these wires are essentially the same except that, a 12-3 wire has an extra wire that is wrapped with a red insulator. This extra wire or conductor often confuses people when connecting wires, but you shouldn’t worry about it. We’ll cover what to do with the red wire in just a while.
Tools for connecting wires
Before getting to work, make sure to prepare all the necessary tools first to make your job a lot faster and more convenient. Below are the tools that you will be needing for this project.
- Voltmeter / Multimeter
- Wirecutter
- Wire stripper
- Pliers
- Wire cap
Safety Precaution for connecting wires
Safety is always a priority when dealing with electric-related jobs. One wrong move can hurt you and others. hence always practice safety when connecting wires.
Here is a checklist of safety reminders you need to follow before you connect wires.
- Turn the electricity off from the circuit breaker
- Test the wires for voltage using a voltmeter or multimeter. If there is electric flow, turn off the main circuit breaker.
- Make sure that your work area is dry and has no access to water.
- Wear gloves and footwear.
How to connect 12-3 wire to 12-2 wire
Step #1. Practice safety precautions
Always make sure that you practice all the safety precautions we listed above. Missing one safety reminder can cause mishaps and put you in danger.
Step #2. Cut the wires
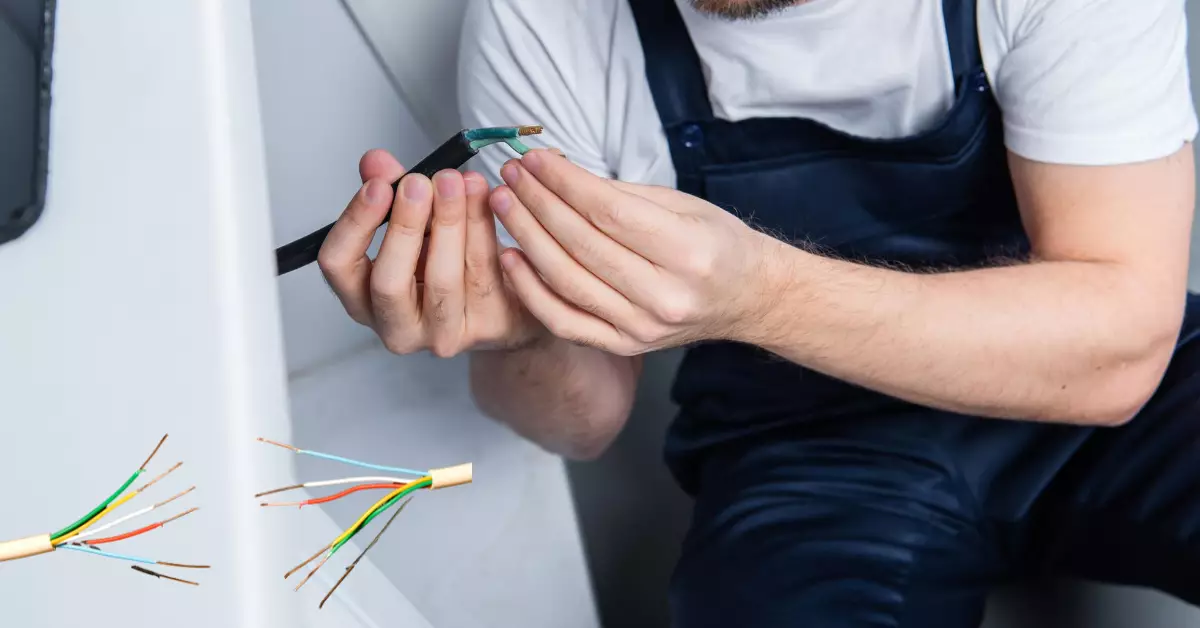
A 12-3 wire has three different colored wires inside. These colors are white, black, and red. Cut the heads of the black and white wires with your wire cutter to remove their protecting wrapping. Leave the red wire as it is.
A 12-2 wire has two colored wires inside. These colors are black and white. Cut the heads of these wires using a wire cutter.
Step #3. Strip the wires
Wires are wrapped in insulators made of plastic. The insulator protects the wire from outside factors that can cause damage and prevent the wires from touching other wires.
When connecting wires, you’ll have to remove or strip these insulators to have access to the wires inside. This process is referred to as “stripping the wires.”
To strip the wires, prepare your wire stripper. You will have to strip about half-inch of the insulation so measure and mark the wire first before cutting.
Place the wire into the hole with a 12 gauge label. Press the handles together to cut the insulation. You don’t need to press intensely, just press until your wire stripper handle can’t be pressed any more. You should be able to feel that the insulator has already been cut off.
If the insulator still hasn’t come off, try rotating the wire or your wire stripper until it comes off. Finally, remove the insulator from the wire.
Step #4. Connect and twist the wires
The black wire is positive and the white wire is always negative. To connect the wires, you will have to pair or match the wires with the same colors. That means black to black and white to white.
Overlap the stripped ends of the wires with the same colors and twist them together with a plier. Keep twisting until they’re tight enough to not separate from each other.
Step #5. Cap the joints
Get a twist-on wire cap and place it securely over the twist or joint you made with the black wires. Do the same thing with the twisted white wire ends.
Step #6. Cap the red wire
Secure the red wire as well with another wire cap on top of it. This is to make sure that it will not touch other wires.
Make sure that nothing is left open and every end has been capped off.
You may see other people using electrical tapes to secure wire ends or joints rather than wire caps. This practice is not advisable as electrical tapes are not secure enough and can be easily damaged.
Final Thoughts
If it’s your first time connecting wires, it is normal and okay to feel scared. However, don’t let fear affect your performance. Always remember the basic rules for connecting the wires.
First, cut the wire ends and strip half-inch of the wire insulator. Then, match the wires according to their color. Finally, twist them together and secure them with a wire cap.
Furthermore, keep in mind our safety reminders for connecting wires. You are dealing with electricity when connecting wires, and we already know how dangerous electricity could get when not handled properly. Always prioritize your safety.