How To Make Gunite

  • Time to read: 10 min.

To make gunite, you will need to understand its composition and gather the necessary materials and equipment. Once you have everything you need, follow these steps to prepare the gunite mix and apply it to your desired surface:

  1. Start by measuring the correct proportions of cement and sand. A typical gunite mix consists of one part cement to four parts sand. Use a bucket or a measuring container to ensure accurate measurements.
  2. In a mixing container, combine the cement and sand thoroughly. It’s important to create a uniform mixture to ensure the strength and consistency of the gunite.
  3. Gradually add water to the mixture while continuously mixing. The amount of water needed can vary depending on the humidity and temperature of your environment. Add water slowly until the mixture reaches a workable consistency. It should be wet enough to hold its shape but not so wet that it becomes runny.
  4. Once the gunite mix is prepared, it’s time to apply it to your desired surface. Load the mix into a gunite machine or a concrete pump for easier application. These machines will help you spray the gunite onto the surface evenly and with greater control.
  5. Start at one end of the surface and work your way across, applying the gunite in thin layers. Overlap each pass slightly to ensure a solid and uniform application. Use a trowel or a screed board to smooth out the gunite as you go.
  6. As you progress, periodically check the thickness of the gunite layer. It should be around 1/2 inch to 1 inch thick, depending on the project requirements. Adjust the application process accordingly to achieve the desired thickness.
  7. Once the gunite is applied, it’s important to cure it properly to ensure its strength and durability. Mist the surface with water regularly for the first few days to prevent it from drying too quickly. This will help prevent cracking and promote proper curing.
  8. After the initial curing period, you can apply a finishing coat to enhance the appearance and smoothness of the gunite surface. This can be done using a trowel or a specialized gunite finishing tool. Follow the manufacturer’s instructions for the finishing product you choose to use.
  9. Allow the gunite to cure completely before subjecting it to any heavy loads or water. This can take several weeks, so be patient and avoid rushing the process.

By following these steps and taking the time to properly prepare, apply, and cure the gunite, you can create a long-lasting and visually appealing surface for your pool or retaining wall. Remember to always prioritize safety and consult with professionals if needed. Good luck on your gunite project!

Key Takeaways

  • Factors like water-cement ratio, aggregate size, and admixtures affect the strength and durability of gunite.
  • Proper mixing techniques should be followed to ensure uniformity and blend.
  • Curing techniques, moisture control, and surface protection are important for the durability of gunite.
  • Regular maintenance and repairs are necessary to maintain the longevity of gunite projects.

Understanding the Composition of Gunite

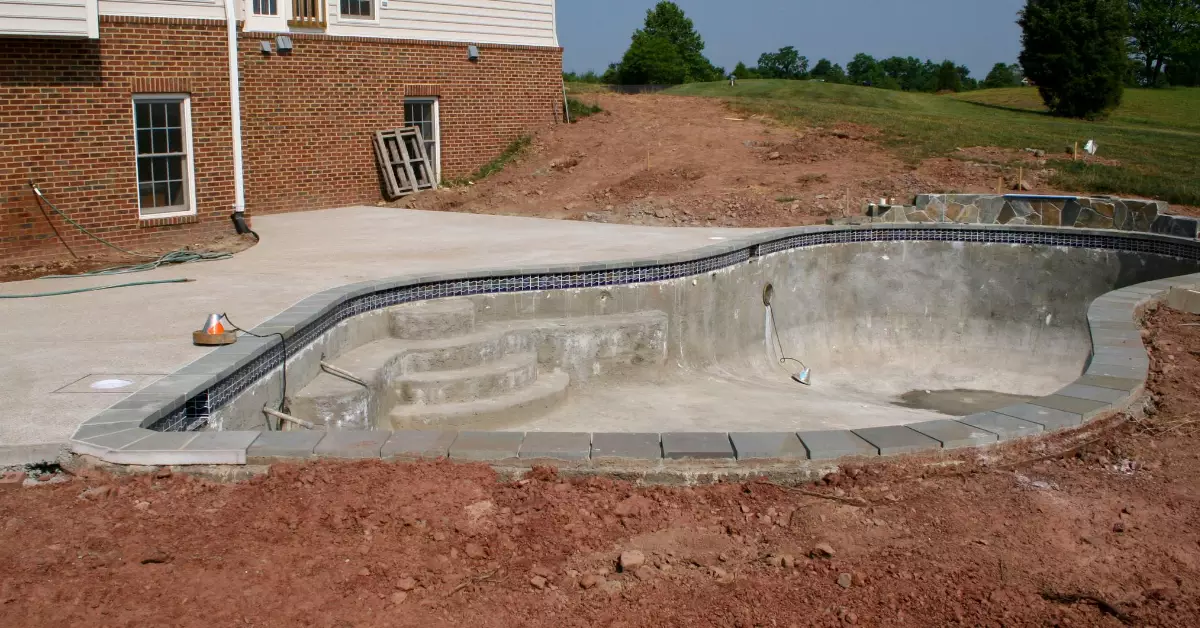
To fully comprehend the intricacies of gunite, you must understand its composition. Gunite is a mixture of cement, sand, and water. It is known for its versatility and strength. Gunite application techniques involve using a high-pressure hose to spray the mixture onto a surface, creating a dense and durable structure.

One of the benefits of using gunite in construction is its ability to adapt to any shape or contour. This makes it ideal for swimming pools, tunnels, and retaining walls. Factors affecting the composition of gunite include the ratio of cement to sand, water content, and the addition of admixtures for specific properties.

Common mistakes to avoid when working with gunite include improper mixing, inadequate curing, and insufficient thickness. Enhancing the durability of gunite structures can be achieved through proper surface preparation, regular maintenance, and the use of protective coatings.

Comparing gunite to other construction materials, gunite offers superior strength, crack resistance, and longevity. Innovations in gunite technology continue to improve its performance. For example, the development of shotcrete, a faster and more efficient application method, has enhanced the versatility and practicality of gunite.

Gathering the Necessary Materials and Equipment

To begin, gather all the materials and equipment necessary for this project. It’s exciting to think about what you’ll need to create something amazing! Here are three important items you’ll need:

  • Safety goggles: These will protect your eyes from any flying debris or dust particles while working with gunite.
  • High-quality gunite nozzle: Choosing the right nozzle is crucial for ensuring a smooth and efficient application of the gunite mix.
  • Cleaning brushes and storage containers: These items will help you maintain and store your gunite equipment properly, ensuring longevity and optimal performance.

Remember to prioritize safety by wearing protective gear and following safety precautions throughout the process. Additionally, make sure to calculate the correct amount of gunite mix needed for your project and learn proper application techniques.

Troubleshooting common gunite problems and cleaning and storing your equipment are also essential steps to ensure successful gunite production.

Preparing the Gunite Mix

When preparing the gunite mix, you’ll need to focus on three key points:

  1. Mixing the ingredients: Thoroughly mix the ingredients together to ensure a uniform mixture. This will help achieve consistent strength and workability in the gunite.
  2. Proper water content: Pay attention to the water content when adding it to the mix. Adding too much or too little can affect the strength and workability of the gunite. Aim for the right balance to achieve the desired results.
  3. Consistency and strength: Achieving the right consistency and strength is crucial for the gunite. This will ensure that it is durable and able to withstand the intended use. Proper curing of the gunite is essential to achieve the desired strength and durability.

Remember to give each point its own line and leave a double new line after each complete concept.

Mixing the ingredients

Mixing the ingredients for gunite is a crucial step that requires precision and careful attention. To ensure a successful mix, there are various mixing techniques you can employ.

Start by wearing the necessary safety gear, such as goggles and gloves, to protect yourself from harm. It’s also important to follow proper safety precautions, like keeping the mixing area well-ventilated.

If you encounter any issues during the mixing process, troubleshooting tips can help you overcome them. Additionally, there are alternative mixing methods you can explore if you don’t have access to traditional equipment.

Proper equipment maintenance is key to achieving consistent mixes, so make sure to clean and maintain your tools regularly. Common mixing mistakes to avoid include using incorrect ratios or rushing the process.

Remember, the goal is to achieve the desired consistency for a successful gunite application.

Proper water content

To ensure a flawless mix, you’ll want to strike the perfect balance of water content, creating a mixture that’s as smooth as a silk ribbon flowing effortlessly through your hands. The importance of water measurement cannot be overstated when it comes to making gunite.

Too much or too little water can have negative effects on the final result. Excessive water content can weaken the gunite, leading to cracks and reduced durability. Achieving the ideal water to cement ratio is crucial for a strong and long-lasting mixture. Factors such as aggregate type and temperature can influence water content in gunite.

Thankfully, there are techniques for water content adjustment, such as adding or subtracting water as needed. The proper water content also affects the workability of the gunite, making it easier to apply and shape.

So, remember to maintain proper water content throughout the application process for the best results.

Consistency and strength

Now that you understand the importance of proper water content in gunite, let’s dive into the topic of achieving optimal gunite consistency and strength.

Achieving the right consistency is crucial as it directly affects the strength and durability of the gunite. Factors like the water-cement ratio, aggregate size, and admixtures play a significant role in achieving the desired consistency.

It is essential to use proper gunite mixing techniques to ensure a uniform and well-blended mixture. This will enhance the gunite’s bonding capabilities and make it more resistant to cracking.

Additionally, testing the gunite for crack resistance and evaluating its bonding capabilities are essential steps in ensuring its quality.

Lastly, enhancing gunite’s resistance to weathering will increase its longevity and ensure its performance in various weather conditions.

Curing the gunite

To achieve optimal gunite consistency and strength, you need to ensure proper curing techniques. This includes controlling the moisture content, covering the gunite with a curing membrane, and regularly wetting the surface to prevent drying out. These steps are crucial in enhancing the durability and resistance to cracking of the gunite.

Here are three important aspects to consider during the curing process:

  • Timeframe required: The curing process typically takes about 7 to 28 days, depending on the specific project and environmental conditions.
  • Moisture control: It is essential to maintain the right moisture levels during curing to prevent excessive drying or saturation.
  • Surface protection: Covering the gunite with a curing membrane helps to retain moisture and protect it from external elements.

By following proper curing techniques, including temperature considerations, finishing techniques, and regular inspection and maintenance, you can ensure the gunite achieves its full strength and longevity.

Applying Gunite to Your Project

Sprinkle the magic of gunite onto your project and watch it transform into a masterpiece. Applying gunite requires careful technique to achieve a smooth and durable surface. Avoid common mistakes by following these tips and tricks.

Start by properly preparing the substrate and ensuring it is clean and moist. Use a high-quality nozzle to evenly spray the gunite onto the surface, working in small sections at a time.

Keep the gunite mix consistent and avoid adding too much water, as this can weaken the material. To prevent cracks, reinforce the gunite with wire mesh or rebar.

After application, allow the gunite to cure properly by keeping it moist and protected from extreme temperatures. Regular maintenance and repairs, such as patching cracks and maintaining the surface, will enhance the longevity of your gunite project.

Curing and Finishing the Gunite Surface

Curing and finishing the gunite surface involves a meticulous process to ensure the longevity and aesthetics of your project.

Surface preparation is crucial for a successful application. Before applying the gunite, make sure the surface is clean and free of any debris. Once the surface is prepared, applying a bonding agent is essential to enhance the adhesion between the gunite and the existing surface.

After the gunite is applied, smoothing and leveling techniques are used to create a seamless and even surface. This step is crucial for achieving a professional finish.

Once the gunite is smooth and level, you can add decorative finishes to enhance the appearance of your project. From stamped patterns to colored aggregates, the options are endless.

To protect your gunite surface, sealing and waterproofing options are available. These options help prevent water penetration and extend the lifespan of your project. It is also important to regularly maintain and repair the gunite surface to ensure its durability.

By following these steps and enhancing the durability of the cured gunite, you can create a long-lasting and visually appealing project.

Conclusion

So there you have it! Now you know how to make gunite and create stunning projects with it.

By following the steps outlined in this article, you can confidently gather the materials, prepare the mix, apply it to your project, and finish it off with a beautiful gunite surface.

Remember, practice makes perfect, so don’t be afraid to get your hands dirty and experiment with this versatile material.

With gunite, the possibilities are endless – you’ll be shooting for the stars in no time!

Frequently Asked Questions

Can I use gunite for swimming pool construction?

Yes, you can use gunite for swimming pool construction. It offers several benefits such as durability, design flexibility, and long-term cost savings. Compared to other materials, gunite provides a seamless and customizable finish.

The application process involves preparing the surface, spraying gunite, and finishing with plaster. To maintain a gunite pool, regular cleaning and pH balancing are necessary. When considering the cost, gunite may be more expensive initially but offers long-term savings due to its durability.

Some common mistakes to avoid include improper mixing of materials and inadequate curing time. Apart from swimming pools, gunite can also be used for constructing other structures like retaining walls and decorative features.

How long does it take for gunite to cure completely?

Like a fine wine aging in a cellar, gunite curing time can vary. Factors like temperature, humidity, and mix design affect the process. To test for full cure, use a hammer tap test. Accelerate curing with heat or additives.

Avoid delays by avoiding improper mix ratios and inadequate moisture protection. Compared to other materials, gunite cures relatively quickly. Maintain and protect cured surfaces by keeping them clean and properly sealed.

Is it possible to apply gunite on vertical surfaces?

Yes, it is possible to apply gunite on vertical surfaces such as ceilings. Gunite has many advantages over other materials and is commonly used in swimming pools, tunnels, and retaining walls. The process of applying gunite on vertical surfaces can be challenging, but recommended techniques and tips can help achieve a smooth finish.

Can I add color pigment to the gunite mix for decorative purposes?

Yes, you can add color pigment to the gunite mix for decorative purposes. It offers several benefits like enhancing the overall aesthetic appeal. To achieve desired color effects, choose suitable color pigments, mix them properly, and apply the color pigmented gunite carefully. Avoid common mistakes and explore alternative decorative options.

What are the recommended safety precautions while working with gunite?

Are you willing to risk your health and safety while working with gunite? Ensure proper eye protection, respiratory protection, gloves and safety clothing, safe handling of equipment, proper ventilation, precautions against dust inhalation, and emergency response planning.